Thursday, August 11, 2011

About to Wing it

It seems like a long time since the last post - and it is. There is some progress to report  but I have to say that the paying job and other activities continue to have an adverse impact on activity in the ACF.

The tailcone is all but complete. I finished riveting the skins in place and  prepared and riveted the Forward Skin Rib to the tops skin.  


 Here is the completed fuselage cone.


I have decided to deviate from the order of build as have many others and delay the attachment of the empennage to the tailcone as is called out in the order of build. This is due in the main to the lack of storage space for the tailcone plus empennage. I did have a dip into Section 11 (Empennage Attachment) though  in order to attach the fibreglass fairings to the rudder and to the vertical stabilizer assemblies. This proved to be relatively easy with some trimming of the fibreglass accomplished with the aid of the trusty Dremel tool with cutting disk and sandpaper over both rectangular and round configuration sanding blocks. Here they are cleoced in place and test fitted ready for riveting. 


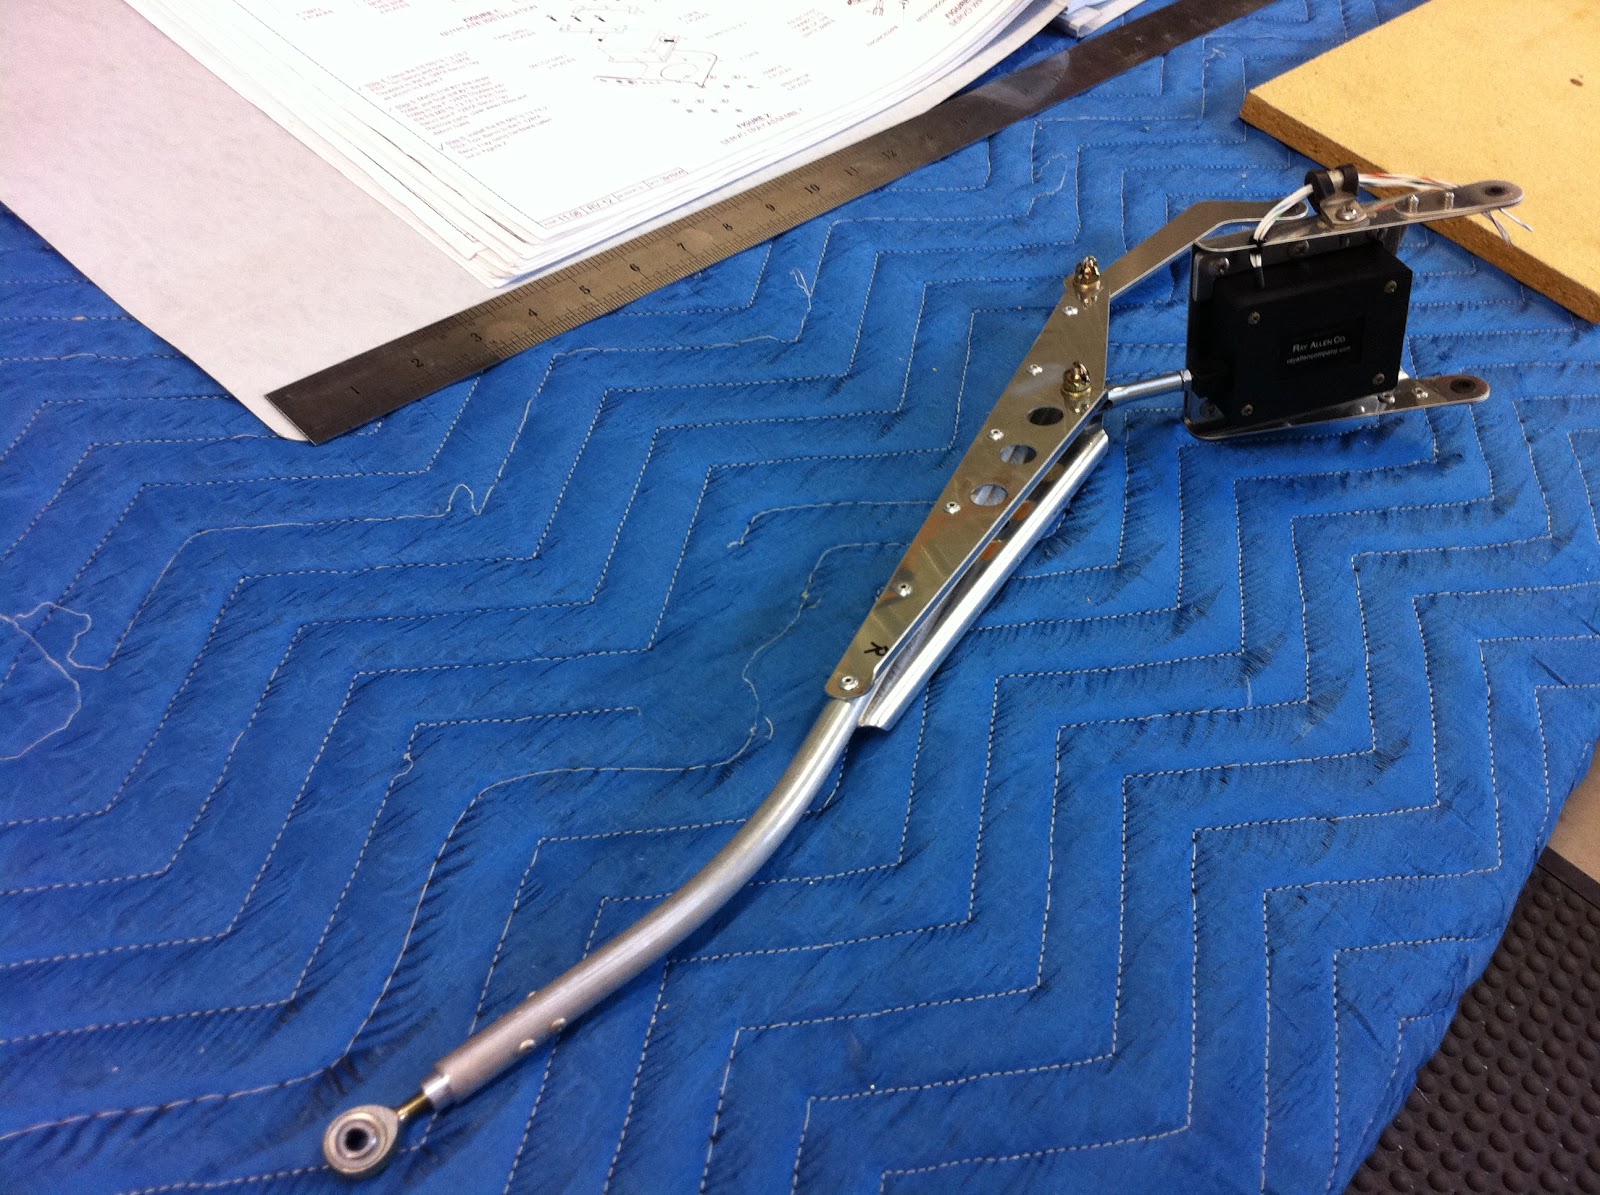
After riveting these in place I decided to attack  the construction of the Pushrod Assembly. This involves a 12 volt servo unit attached to a rod which when finally installed will connect with the anti-servo tabs and provide elevator trim capability  in fight by adjusting elevator control pressure. It gets installed at the same time as the empennage, now a way down the track. The servo unit wiring is also connected to the wiring that is currently protruding from the rear of the tailcone. I would have installed the connectors to the wiring on both, but I need to acquire a much better crimping tool. It's incredible how this plane building provides the perfect excuse to populate the tool kit with new and better goodies.

Oh yes, and the (later) fitting of the pushrod assembly requires among other things the fabrication of a couple of spacers carefully cut from the provided 5/16 aluminum tubing. This makes perfect sense, save that I don't have sufficient aluminum tubing left as a consequence of a miss-cut in an earlier process. I feel an order from Oregon coming on. I'm thinking about what else I need to order to minimise the pain of heavy freight cost for a part that weighs about the same as a couple of ball-point pens.  
   

Onwards and upwards, its time start on the wings or specifically one wing as I don't have space to build them both at the same time, which I'm sure in an ideal world would make a whole lot of sense. I spent a happy hour or two sorting the hardware - nuts, bolts, rivets etc. etc. into labelled bins so that they are easily found when needed. This instead of sorting throgh numerous of the ubiquitous Vans paper bags.I then proceeded to unload the parts stored in the crate in which they arrived, and stacked them in sub-kits in shelving adjacent to the construction table. The skins stay in the crate, safe and sound until needed.

I started at the beginning - that would be Step 1 in the plans that requires the separation of some attach angles. I deburred the edges and holes in these, and that folks is the sum of progress to date.


Wednesday, July 27, 2011

Better late.....................

It's overtime for an update. Friends, no posting does not mean no action. I have excuses, but will keep those to myself. this post will update a few (part) days of building. It chronicles  a fair part of the assembly of the tailcone. The final preparatory part of the rear bulkhead assembly was to attach the bushing and hinge brackets called out in this section of the plans


This is followed by test fitting the rear bulkhead to the stabilator assembly incorporating selection of the appropriate washers to ensuire a good fit. This was completed with only a minor wrestle of the tiny washers into place, assisted  by the judicious application of super glue to hold said washers where they should be.


The preparatory work now complete, attention now turns to the assembly of the tailcone. It could just be that this will herald the first identification of the project as something approaching the look of an aircraft part. We shall see. This is the laying out of the first of the skins (bottom - the  assembly is upside down at this point).
You can see here the three tailcone ribs attached to the bottom skins with the left bottom skin clecoed in place.

Here with the bottom and left and right bottom skins riveted in place.


Paul turned up at this point and helped with the clecoing and riveting of the side skins. The whole assembly was turned the right way up and some strings run to assist the later installation of the control cables, very difficult once the tailcone is closed up, unless the strings are available to pull them through.


Here the novice master builder is running and affixing wires that control the trim mechanism
 

As shown here the wire protrudes the required distance from the rear bulkhead assembly (now clecoed in place), later to be connected to the motorised trim mechanism

 
I thought this looked like an outstandingly good (and simple) effort. Later that evening I was browsing the Vans forum and discovered that other builders have provided advice that there is a right and wrong way to install this wire, the connector pins need to be at the front end. Strangely the otherwise comprehensive building plans are silent on this point. With a 50/50 chance of stuffing this up, I repaired to the shed and cautiously removed the tape evident on the end of the wires shown above. Sure enough - pins! I'm going to need to remove a number of cable ties and reverse the wire. Fortunately I have yet to put the top skins in place so I have access to do this. No drama.

Blissfully ignorant of this at the time, Paul and I  pressed ahead with the clecoing and riveting. It was great to have help with this, it's amazing how quickly it goes with two on the job. 


So this is the current  state of play. The affixing of the top skin, a stiffener and the fixing plate as shown below will complete the tailcone section of the build. 


I think it's progressing well given the competing demands for construction time and given that construction only  began on May 26th. This is fun - and very satisfying.

Wednesday, July 20, 2011

Short But Sweet

Just a short session tonight after the paying job.

The job at hand is to rivet numerous places in the rear bulkhead assembly. I counted them, there are exactly 88 of the little ******s. For me the most challenging part of the build so far has been to set solid rivets properly. I have become reasonably adept an drilling out those that are not up to standard. So much so in fact that as I think I have mentioned, I am fearful of running out of rivets.

Given this I confess that I approached squeezing these 88 with due respect (read fear and trepidation). It is complicated by there being several different rivet types and getting them in the right places requires some concentration. Imagine my surprise when the task was completed without a single oops. Its too good to be true really and my riveting confidence is greatly enhanced. I must say I did take extra care. Now I'm no engineer but it is evident that a good part of the back end of the airframe attaches to this bulkhead. This probably explains why it's very solid and has lots of rivets. This is quite encouraging really for those of us brave enough to go aloft in this ship at some point in the future. Here it is.


 The next job is to attach the hinge brackets and bearings to this assembly, some test fitting and then on to the assembly of the tailcone. This sounds like fun!
   

Tuesday, July 19, 2011

A Tail of Two Weeks

 You don't have to tell me, I have been slack. No posting for 9 days and seemingly not huge progress, but rest assured I am moving forward. I have discovered that the aircraft construction business needs to proceed alongside the activities of daily living. This includes working, eating, sleeping and attending to the ebb and flow of  life in a family full of activity and fun. With a  new grandchild delivered up in the last couple of weeks, it gets better and better. I even managed to take advantage of a bright sunny day on Saturday and fit in a very pleasant hour reacquainting myself with the pleasures aloft in the J230 at Murray Bridge. Notwithstanding all this subsidiary activity, there is some forward momentum in the ACF, now to be described.

The tailcone is creeping towards final assembly. This wear plate gets riveted on to one of the fuselage frames, I'm not sure why just yet but I'm sure all will become clear in due course.


The fuselage frames all get riveted together including this plate and angle where the F1210 frame joins.


Here they are, all joined up.


Next you get to fabricate this little gem. It is the Tail Skid Bracket. This involves some trimming, drilling and tapping a thread. it looks like this


The work to date has concluded with the preparation of parts for assembly and riveting of the rear bulkhead assembly. The Bulkhead, the Bulkhead doubler, the Stabilator Hinge Attach Brackets, the Shear Clips and the three J Stiffeners are all prepared and ready to go.


The next steps involve many many rivets to the rear bulkhead assembly, and just to top off the treat, this task incorporates 8 nutplates. Something to look forward to.

Sunday, July 10, 2011

Home Again, New Life and Back to (Aircraft) Work

We returned on Friday from an excellent week of R&R on the Murray River. We departed from Mannum and headed upstream as far as Big Bend (just short of Swan Reach) and turned back at the half way point.


A few mechanical issues with the houseboat failed to deter the intrepid voyagers who enjoyed a week replete with good food, good wine and good company.


There's never a dull moment here, no sooner were we back than on Friday night  grandchild number seven shrugs off the bonds of confinement and slips into the light of day, well night actually. Jackson Brock Moen, son to Chris and Siobhan. Of course this demanded urgent grandparent attention  in the form of a Saturday trip to Adelaide to visit the happy family. All is well as you can see, meet the star of the show.


.
Today the call of the ACF proved irresistible and I put in a full day commencing Section 10, the Tailcone construction.


 Step 1 requires the preparation of the skins that will cover the tailcone. This involves the deburring of many hundreds of holes in several skins as well as deburring the edges of the skins and providing a slight 'break' (bend) on the edge of some skins so that they sit flat on top of  the mating skin.  I have a horrible feeling that I 'broke' some the wrong way, but am not stressing too much. I think I can rectify this if indeed it proves to be an issue.  This took pretty much the whole day, was unimaginably monotonous, and thankfully is now complete. It was so monotonous that I can't bear to insert a photo, which is just as well because I don't have one. I'll start the next session thankful that is behind me. The thought of doing all those wing skins a way down the track does not bear thinking about....................

I finished up the day completing step 2 which requires preparing and putting a slight bend in this angle piece. The instructions say "Flute the F-1210C Angle at the places called out in Figure 2. Each flute needs to 'hump' in the same direction as the 5 hole flange." Goodness me! Fascinated? Here it is.


Next comes the preparation of the fuselage frames. These are they, anxious for further attention

next time.

Wednesday, June 29, 2011

Section 9 Nutted

I only had the opportunity for a very quick session tonight, like 20 minutes,  after the paying job, but it was enough to finish the stabilator and therefore  Section 9 in the manual.

Work tonight involved temporarily fitting the counterweight arm to the stabilator assembly,  match drilling the lead counterweights and fitting the counterweights to the counterweight arm.

It's all done, goodbye Section 9.


You would not have to be too observant to see that I am already running out of storage places  for completed parts, I really do need to give that some serious attention. The bits that are coming are even larger, we might have to move out of the house....................

Next it's hello tailcone. That is the kind of cigar shaped cylindrical part between the tail section, now completed and the bit you sit in, roughly between the wings. For those of you foolish enough to be regularly keeping up with progress, you'll need to be patient. On Friday we embark on a 1 week houseboat voyage on the Murray River with Tim & Kylie, Remy and Danger (Taylor), Kylie's Mum and Emu (Greg) and Sue. I'll post some photos on our return. This should provide some light relief for those of you who are bored witless by aircraft construction.

See you then!

Monday, June 27, 2011

Moving right along

Yesterday I managed a reasonably early start to what proved top be a pretty satisfying day's work on the stabilator.The first order of the day was to finish preparation of the skins, as usual deburring edges and holes. Let me tell you there are lots of holes! This is the right skin ready to go.


Once they were complete you slide the the spar box assembly inside the skin and cleco it in place. It's amazing hole precise this kit is, all of the holes aligned beautifully. Don't you just love it when a plan comes together. This is starting to look like a big job so I whistled up assistant aircraft constructor Tim to help. To fill in time I prepared the aft ribs by deburring etc. When he arrived we began in earnest clecoing, riveting de-clecoing (might be a new word) until eventually both skins were securely in place. It sure helped having assistance for this as it saved changing tools every few seconds to de-cleco and rivet. Its a shame I didn't take more photos, I must do better at remembering that. I do have one of progress with skins on though. AAC Tim is pictured.


The next step is to affix a splice that secures the two skins together at the rear of the stabilator and to rivet the previously prepared hinges in place that are the attach point for the anti servo tabs that I previously constructed. I do have a photo of that. You can see in the distance the aft ribs which also get riveted in place at this point.


We're in the home straight now with just three jobs to go. First is to fix in place the Aft Skin on both the left and right sides. Here is the right side clecoed in place ready for riveting.


And the left side all complete.


The second last job is to bolt in place the upper and lower control horns. Here they are.


 The very last task in Section 9 is to prepare and fit the counterbalance arm, it goes in the hole you can see above. But that is a task for another day. Here is the almost completed stabilator. Isn't that a thing of beauty!


Saturday, June 25, 2011

Back on track

This morning, we journeyed to Adelaide to get Carol's glasses sorted out.

Back to the ACF at midday and working to get  back on track now that the
parts have arrived.

The first task was to reconstruct the stuffed up vertical stabilizer upper hinge assembly. Here it is ready to be bolted on.


The infamous missing WD 1208 lower stabilator horn was clecoed in place, the holes final drilled and the nutplates to which it is fixed were installed on the forward and aft spars. I'd like to show a picture of this, but I don't have one.

Here is the completed spar box assembly ready for the rib clips and ribs to be installed.  


At this point the aft ribs are clecoed ready for riveting.


The forward ribs are clecoes and riveted in place. The stabilator skeleton assembly is now complete.


There is one more job before the skins are introduced. This is to install the stabilator hinge brackets to the forward spar. These were prepared the other day with nutplates riveted in place and  spacers cut from aluminum tube. The installation requires the brackets to be bolted in place. The spacers need to be  to be a snug fit between the brackets. Mine weren't. Fortunately there was some tubing left so I was able to cut some more to fit. I hope that tube was not meant to do somewhere else........... Here are the brackets completed.

 
The last job for the day was to begin preparation of the stabilator main skins for riveting to the stabilator skeleton. I worked on the right skin, deburring the holes and removing the blue plastic.


Tomorrow I will debur the edges of the skin and repeat all these processes on the left main skin.

It's good to be back on track, building in sequence according to the plans. All in all, a satisfying day,